

TuneCable iTadal Music Converter
 >
How To >
Tidal Music Tips >
Tidal is a music streaming service that boasts an impressive library of millions of songs, curated playlists by artists, and exclusive backstage content. The platform is recognized for delivering high-quality audio in a lossless format, but with a higher price tag than other streaming services.
While Tidal's membership is similar to rivals like Spotify and Apple Music, its premium audio tracks come at a cost of £20 per month, making it a less budget-friendly option.
If you're nearing the end of your free trial or discovering that your Tidal subscription isn't serving your needs, this guide will walk you through the steps of canceling your Tidal account.

When looking for a way to change the Tidal plan, you can do it through the Tidal web player or app on different operating systems.
Step 1: To modify your Tidal subscription, go to the "menu" ![]() button, and then access the "Files > Settings" on the platform, and select the "Account" Tab.
button, and then access the "Files > Settings" on the platform, and select the "Account" Tab.
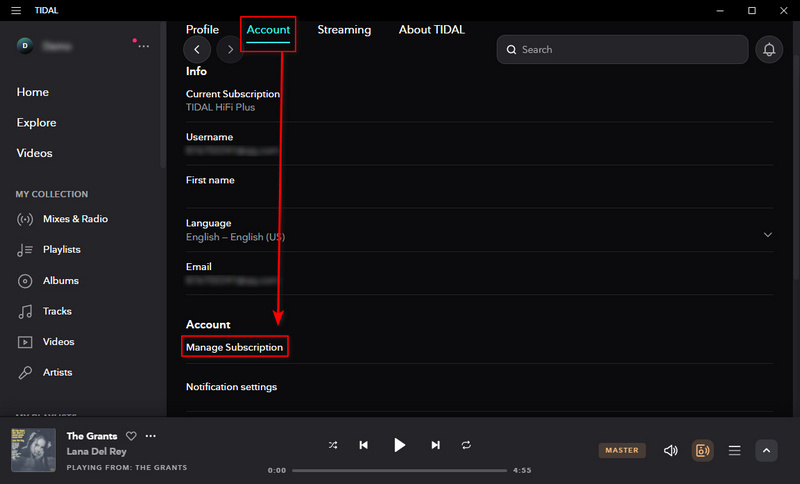
Step 2: From there, scroll down and click on the "Manage Subscription" button.
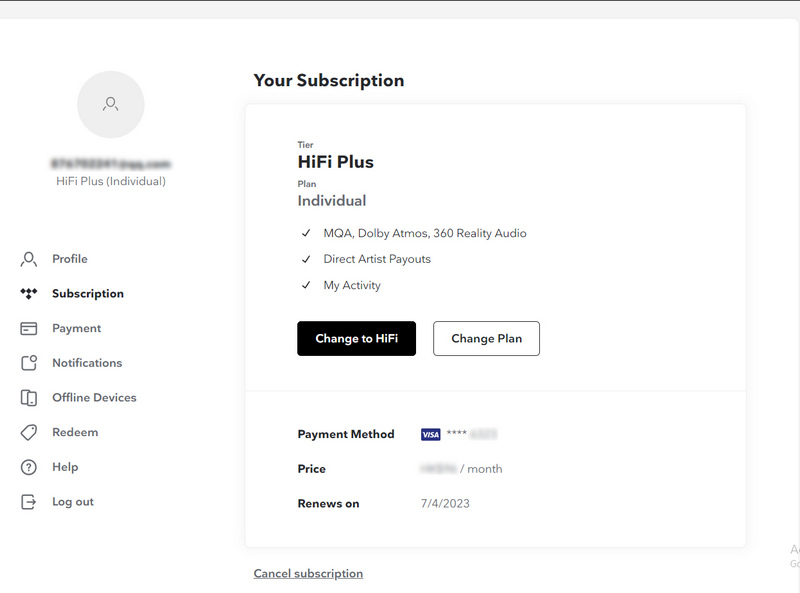
Step 3: On the pop-up page, tap on "Your Subscription". You will be prompted to select "Change to HiFi" (for TIDAL Individual members) or "Change Plan". Choose which plan you want for the next month and make a confirmation.
You may be interested in experimenting with one of Tidal's competitors, such as Spotify, Amazon Music, or Apple Music. Perhaps you feel that Tidal's content isn't satisfying your needs, or maybe you'd prefer to allocate your funds elsewhere. In any case, you'll need to terminate your Tidal subscription. If you find yourself in this situation, you've landed on the right page. To cancel your Tidal subscription, simply follow these easy steps on the Tidal website, on your phone, or through your mobile carrier. Be sure to cancel before your next payment is due to avoid being charged.
# How to Cancel Tidal Subscription on Desktop:
If you signed up for Tidal online and want to cancel it on a computer, please follow the steps below.
# How to Cancel Tidal Subscription through Mobile App:
If you signed up through the Tidal app using a credit card or PayPal, this step is for you.
# How to Cancel Tidal Subscription on iPhone/iPad:
If you directly subscribed to Tidal from your iPhone and you can view the Tidal subscription in your Apple Wallet, you can cancel the subscription by following these steps:
# How to Cancel Tidal Subscription through Sprint:
When you are subscribed to Tidal through Sprint, then you should ask their support for help.
# How to Cancel Tidal Subscription through Mobile Carrier:
To cancel your Tidal subscription that's registered with a mobile carrier, you need to contact the carrier directly for any assistance you may require, as Tidal is not able to modify your account.
In addition, Tidal specifies that users who pay for the service through a third-party platform must cancel their subscription through that service.
Tidal songs are downloaded as secure cache files, meaning that they are not actual song files, and you do not have ownership of them. Consequently, if you cancel your Tidal subscription, any offline downloads you have will be lost. However, there is a way to preserve Tidal music permanently as local files.
To avoid losing your hard-created Tidal playlists, TuneCable iTadal Music Converter is feasible to extract songs from Tidal as well as decrypt them. All types of Tidal plans can be used to offline download songs through TuneCable, including Tidal Free.
After converting Tidal songs, albums, or playlists to unprotected MP3, AAC, FLAC, WAV, AIFF, and ALAC files, you are enabled to transfer them to iPhone, Android phone, MP3 players, or import them to other apps for offline listening, such as iTunes, Spotify, etc. The multiple options in the output format setting ensure compatibility with most devices and programs.
TuneCable Tidal Music Converter stores Tidal songs in the original quality, including master-quality tracks and albums. You can save the converted Tidal tracks by Playlist, Artist, Album, and other ways, which contributes to reducing the time to track any Tidal song after conversion.
Key Features of TuneCable Tidal Music Converter:

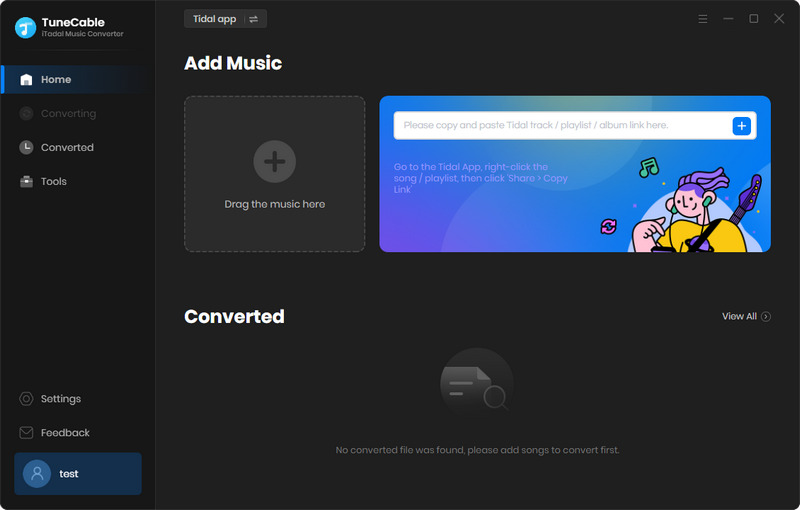
Step 1: Initiate TuneCable Tidal Music Converter on PC
Tidal music can only be downloaded through its mobile app, but TuneCable downloads the songs to your local computer. Get the correct version installed on your Windows PC or Mac, then you can start the program for converting Tidal songs.
When launching the TuneCable Tidal Music Converter, you need to make a choice between downloading music from the Tidal app or Tidal web player.
If you download music from the Tidal app, the Tidal desktop app will also open. It's known that the best streaming quality in the Tidal web player is HiFi while you can stream max-quality music in the Tidal app. That's why some users chooses to record songs from the Tidal app.
If you download music from the web player, a built-in Tidal web player will pop up.
Step 2: Choose Tidal Song, Album, or Playlist to Download
Downloading music from the app: There are two methods available for adding Tidal songs to the task list. You can directly drag and drop the preferred track, album, or playlist from Tidal to TuneCable. Otherwise, right-click on the song, album, or playlist and then tap on the copy URL option from the pop-up menu. Then you need to paste the link into the TuneCable parsing box.
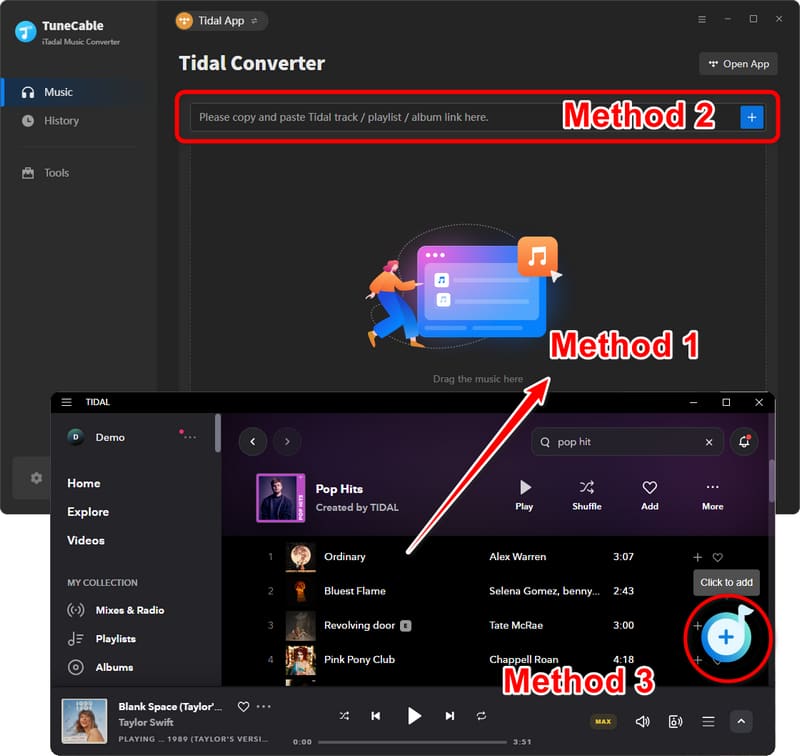
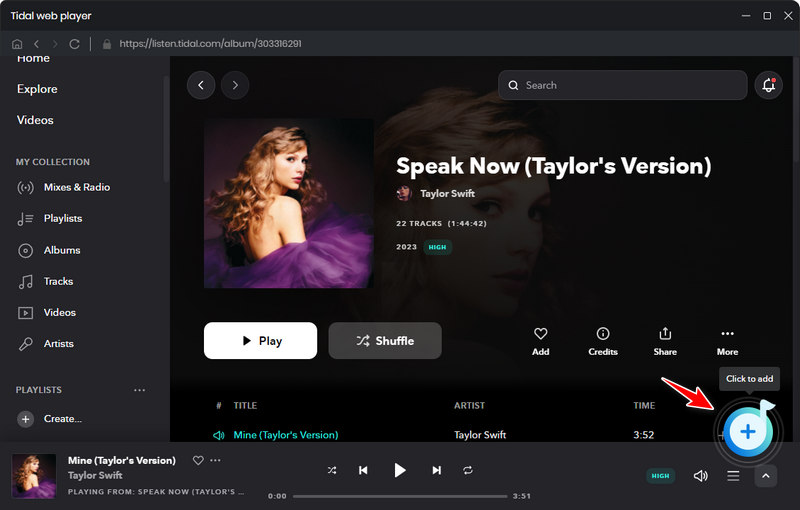
Downloading music from the web player: Open any album or playlist, then tap on the "Click to add" button in ther lower right.
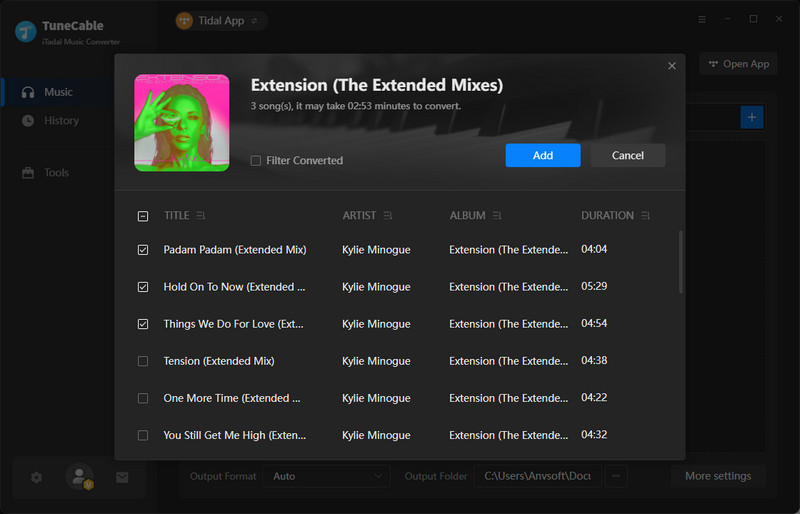
After a while, TuneCable will load the Tidal songs. Check if you need to download all songs at once, if not, deselect those unwanted tracks then click on the "Add" button.
Step 3: Customize the Other Parameters
In a hurry to start converting songs now? Wait, adjusting the output format is also a very important thing, and it needs to be set in advance before conversion. On the left side of TuneCable, you can see a "Setting" button, click it to pop up a setting window. On this page, you can personalize and customize your output settings. If you want to keep the original sound quality and format of Tidal songs after conversion without trouble, then you can directly select "AUTO" in the 'Output Format' column.
Changeable Output Settings:

Step 4: Convert Tidal Music to Local Files
Go back to the "Home" section. If you only need to convert the selected songs, then you are good to go. But some users wish to convert more songs at one time. Then you can click the "Add More" button on the upper left. A pop-up window will then direct you to add more songs from other playlists or albums.
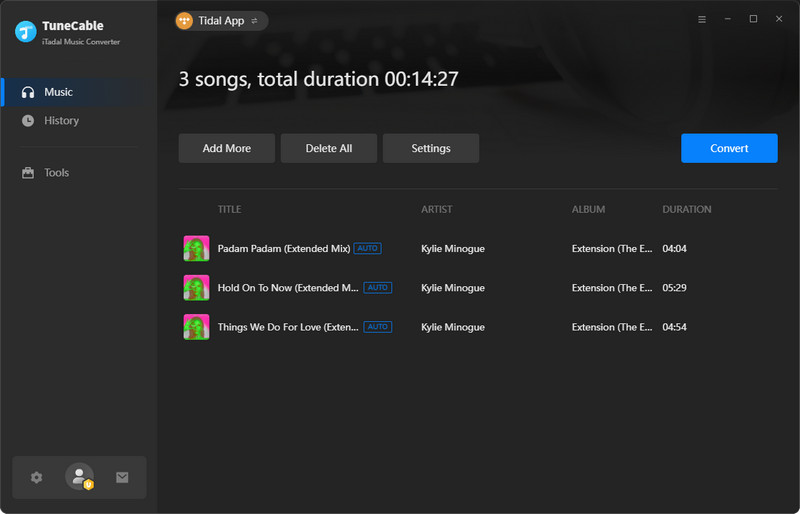
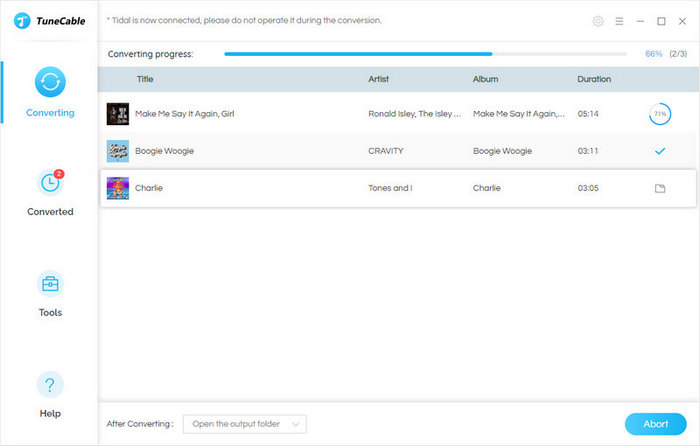
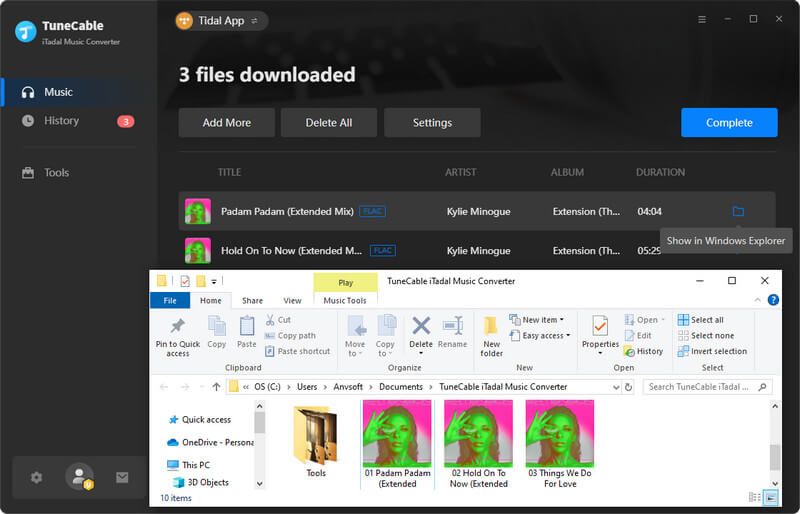
When everything is ready, just click the "Convert" button to trigger the conversion. By default, the output folder will open and then you can view the downloaded Tidal songs on your local computer. You are free to apply them for personal purposes.
💡 Why can’t I cancel my TIDAL subscription?
Below are some possible reasons why canceling your TIDAL subscription may not be feasible. These could be owing to contractual commitments with the service provider, or because you've exhausted your allocated period. Moreover, some services, such as TIDAL Hi-Fi, may necessitate a more extended cancellation procedure than others. If you're still unable to resolve the matter, please don't hesitate to contact TIDAL support for assistance.
💡 What happens when you cancel your TIDAL subscription?
Tidal offers three membership tiers: Tidal Individual and Tidal Family. Members with a Tidal Individual account can download Tidal music for offline listening, but this feature is limited to mobile phones, and the downloaded music can only be played within the Tidal app while offline. If you cancel your Tidal subscription, you will lose access to Tidal music, even if you have downloaded it on your mobile device. As Tidal music is a paid subscription app, all downloaded Tidal songs are cache files and not actual songs. To keep Tidal music playable after canceling your subscription, you will need to subscribe to Tidal again or convert the Tidal songs to local files by using TuneCable.
💡 How do I change my TIDAL subscription to family?
Initially, you'll have to log in to your TIDAL account. After you've signed in, click on the "My Account" tab and choose the "Subscriptions" option. On the ensuing "Subscriptions" page, select the "Family" subscription type and press the "Change" button. Then, enter the email address of your family in the "Email Address" field and hit the "Change Subscription" button.
💡 How do I remove my credit card from TIDAL?
Navigate to the TIDAL website's "My Account" page and choose "Manage Cards." This will enable you to see all of your cards, terminate any that you no longer require, and revise your account details.
💡 Can you listen to music on Tidal without a subscription?
Tidal allows users to stream music online with interval ads after signing up for a Tidal Free account. But offline playback is not permitted unless you download them via TuneCable Tidal Music Converter.
💡 Can you share the TIDAL subscription?
Recent reports suggest that TIDAL is disclosing subscriber data to the music industry. This implies that they are gathering not just personal data but also aggregate information from users, which could be exploited to influence charts and sales figures. It appears that TIDAL is facing difficulties, and it may not be long before they are compelled to cease operations. But you can download Tidal songs to common formats via TuneCable Tidal Music Converter, then share the downloaded Tidal songs or playlists with your family or friends.
There are different reasons for terminating Tidal subscriptions, but the consequences of canceling the subscription are basically the same. If you want to keep your favorite Tidal songs or playlist, it is the most sensible choice to use TuneCable iTadal Music Converter to save them locally. These offline downloads will not become unplayable due to the cancellation of the Tidal Music subscription. As long as you need, you can enjoy these saved songs anytime and anywhere. TuneCable unlocks more advanced features of Tidal music. If you want to start a free trial of this tool, you can click on the download button and start your journey right now!
 What's next? Download TuneCable iTadal Music Converter now!