

TuneCable Apple Music Converter
Apple Music is a streaming music service that offers a wide variety of content to its users. The platform gives access to millions of songs, albums, and artists, as well as curated playlists and personalized radio stations. It also allows artists to upload their music for exclusive distribution. With its intuitive interface, Apple Music makes it easy for both casual listeners and music aficionados to find the perfect track. Plus, its high-quality audio ensures an enjoyable listening experience. Whether you’re looking for something new or just want to reminisce with old favorites, Apple Music has it all. With its extensive library and innovative features, Apple Music is the ultimate destination for modern music lovers.
Notwithstanding tons of advantages, Apple Music users make a lot of complaints. In many music-related forums, you can often see Apple Music users share their bizarre experiences, that is, the playlists they worked hard to create will be suddenly removed. Some people think that this is just a program bug of Apple Music, but in fact, there are more factors. Read this article carefully and we will answer your doubts. And this article will also provide a solution that is very suitable for you so that you no longer worry about the sudden deletion of songs and playlists on Apple Music.
If you find that some of your songs and playlists have been deleted from your Apple Music library, it could be because your subscription is no longer valid. This could be due to a payment issue or an expired subscription.
Apple will bundle all its products and software, so many users will not just use a single Apple software. For example, Apple Music will allow registered users to use it with iCloud Music Library. When you enjoy songs on Apple Music, you can upload and store songs to the cloud through the matching iCloud Music Library. This operation is so that you can listen to the songs you uploaded to the cloud on other iOS devices at any time. But the songs you save to iCloud during your subscription to Apple Music are protected by DRM. So when you decide not to renew the subscription, the songs downloaded through iCloud Music Library will also be automatically deleted by Apple Music.
If your Apple Music subscription is invalid, you won't be able to stream music or download songs until you update your payment information and/or renew your subscription. Your Apple Music library will also remain incomplete until then. To prevent this from happening in the future, you have to make sure that any payment or subscription plans associated with your Apple Music account are kept up-to-date. Failure to do so may result in the loss of some or all of your music library.
Apple Music has an automatic feature that removes unused songs from iPhones or iTunes. This is meant to save storage space on the device and ensure that users have access to only the music they are actively listening to or intending to use in their playlists. The service generally removes automatically downloaded items after 30 days of their last access if it appears that they haven't been used. That said, users can still manually delete songs and other content from their device by going to the “Recently Added” tab in Apple Music and tapping on the song or album they would like to remove. They can also manage their music library through iTunes if they prefer a desktop solution. Ultimately, Apple Music is designed to provide an easy and streamlined way to access, manage and delete music from iPhones or iTunes.
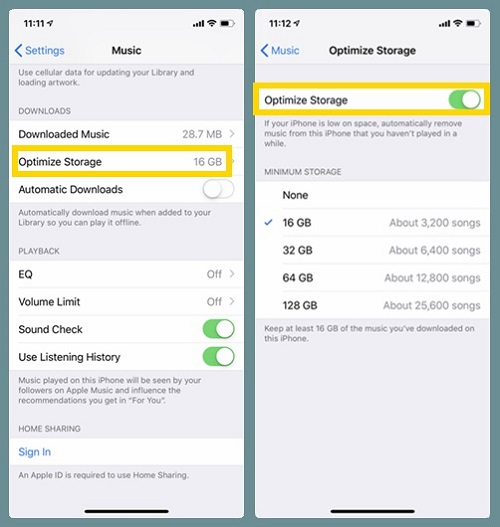
You can check the "Optimize Storage" setting on your iOS device. Get access to your iOS device, then go to "Settings > select Music > Optimize Storage". Now, you can turn off this option to enable this feature.
Your iCloud Music Library might be disabled after an iOS system update. And when this feature is disabled on an iOS device, your previously downloaded songs will be removed as well. Also, when users use a new iPhone or iPad, the iCloud Music Library may be not turned on yet. So at this time, we can check whether iCloud Music Library is enabled.
Use the Apple ID with Apple Music to sign into the iPhone or iPad. Then open the Settings app and go to "Music". Find the iCloud Music Libary option, and then slide to the right side to turn on this feature.
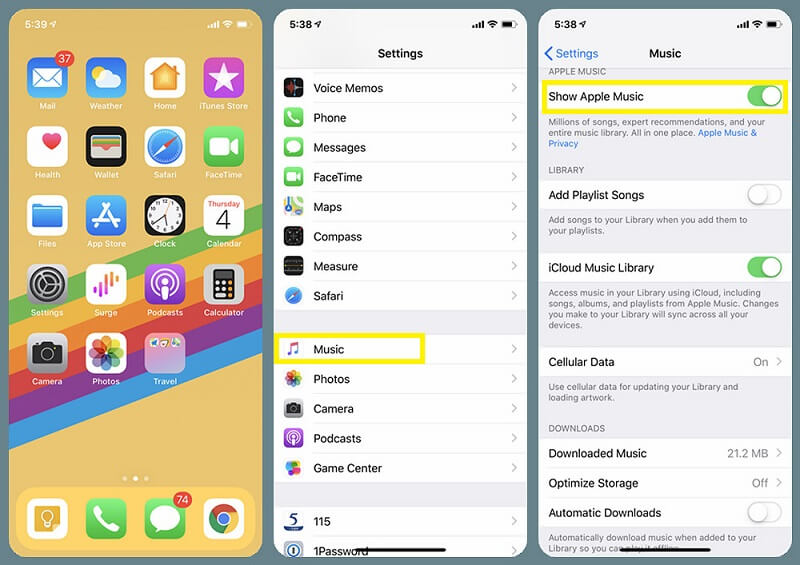
When opening Apple Music, the "For You" tab is missing, or you cannot find your Apple Music streaming songs in the app, what should you do? Don't panic. Go to "Settings > Music" to enable the "Show Apple Music" feature. If the "For You" tab still doesn't appear, you can restart Apple Music and your device. Then check it again.
When there is not enough space on your device, Apple Music may delete songs from the music library and make you re-download songs.
For iOS users, you can open the settings app and go to General > [Device] Storage to check if the space is full. Remove some useless items from your iOS device, then go to "Settings > select Music > Optimize Storage" to turn off the "Optimize Storage" feature.
For Android users, you can simply go to the setting app and check the state under the "Storage" section. Then free up some space on your device.
It can be difficult to stop Apple Music from deleting songs from your music library since Apple company reserves all rights to Apple products and services. Are you ready to give up? Fortunately, an Apple music converter can help you keep your playlists after unsubscribing from Apple Music. Moreover, it provides the most efficient way to remove the encryption from Apple songs to protect you from losing Apple Music playlists fundamentally.
TuneCable Apple Music Converter is a prominent music downloader that swiftly downloads songs, albums, playlists, podcasts from Apple Music and stores iTunes downloads, and audible audiobooks to the local space in unencrypted MP3/AAC/WAV/AIFF/ALAC/FLAC formats.
TuneCable Apple Music Converter can easily convert multiple music playlists in bulk and retain the meta information for every downloaded track. The downloaded Apple songs become your private Owings and will not be deleted again unless you dump them one day.
Key Features of TuneCable Apple Music Converter:

Let's jump into the detailed steps to convert Apple Music playlists to common formats and keep them forever.
Step 1 Start TuneCable Apple Music Converter on Windows PC or Mac
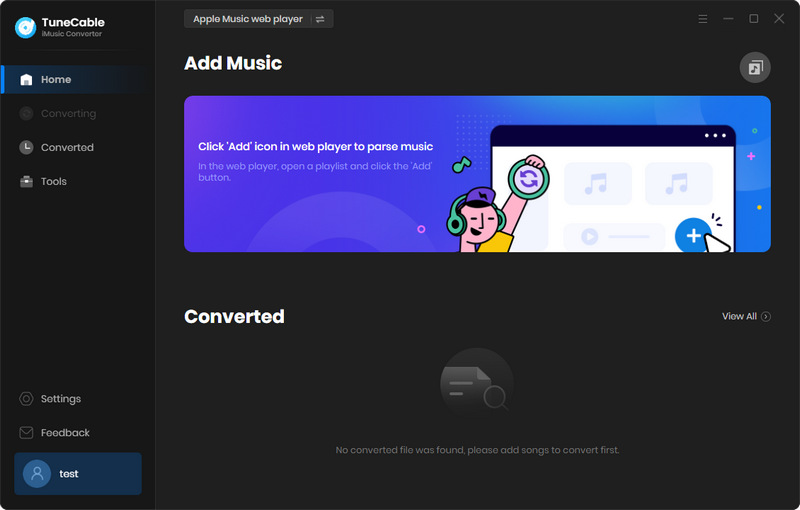
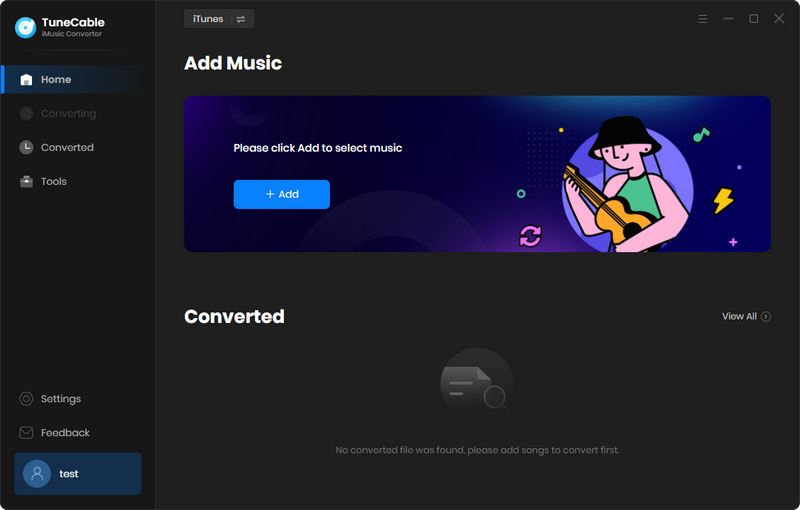
You can choose either the Windows version or the Mac version to install. Going through the installation, double-click on the TuneCable Apple Music Converter icon and start it. On the primary interface, choose recording music from the iTunes app / Apple Music app or recording the music from the Apple Music web player.
If you choose to download music from the app, check if the latest iTunes app is installed on your Windows PC. On Mac, you need to install the latest Apple Music app. Log in to your Apple account via iTunes or the Music app to make sure the music library will be loaded later.
If you choose to download music from the web player, the built-in Apple Music web player will pop up.
Step 2 Select the Wanted Tracks to Download
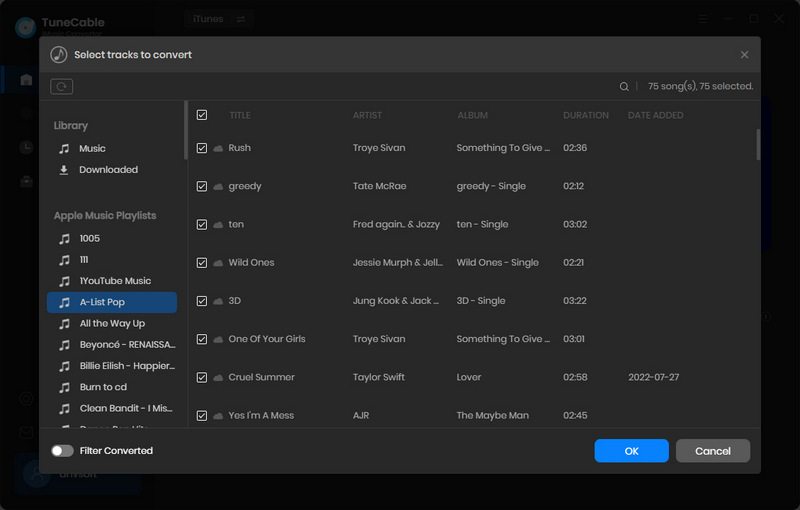
Download music from the app: On the start-up page, click on the "+Add" button. The songs and playlists of Apple Music will be loaded on the main interface. If there is any update in your Apple Music library, you can restart the program and then the playlists will be synced. Select the music tracks you want, then click on "OK" to add them to the task list waiting for conversion.
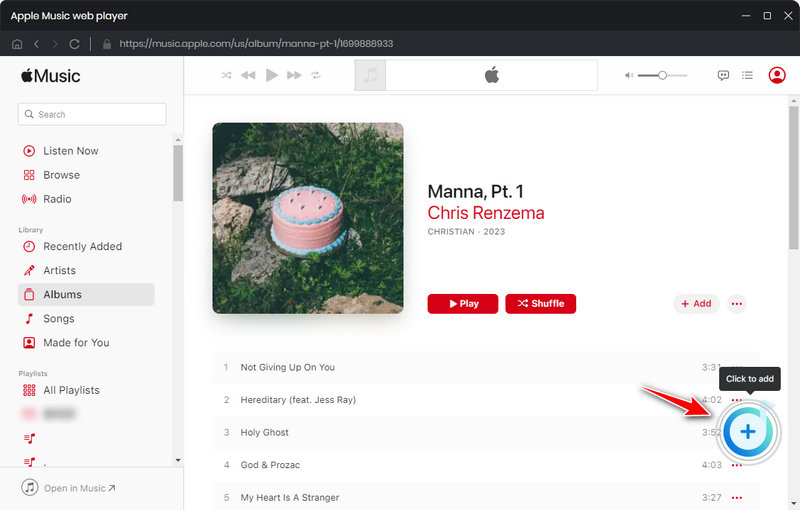
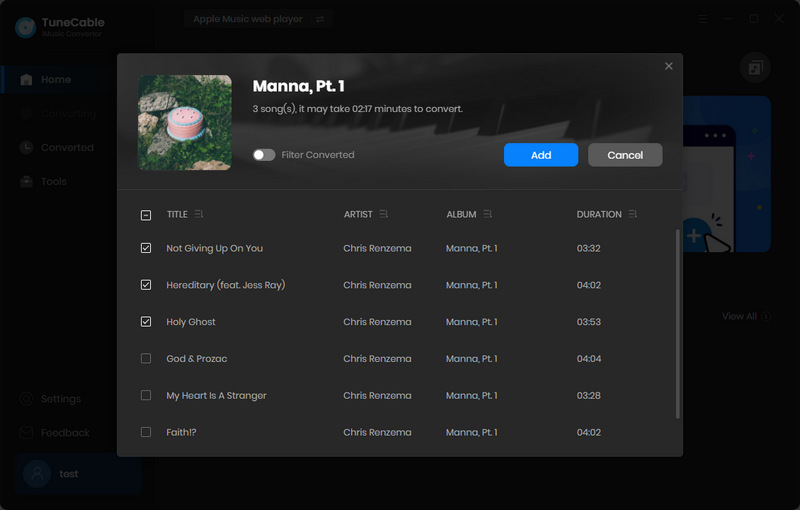
Download music from the web player: Navigate to any desired album or playlist in the pop-up Apple Music web player, enter its homepage and hit the "Click to add" button in ther lower right to load songs. Then select the desired tracks and click "Add" to put the selected songs to the download list.
Step 3 Set the Output Format and Other Parameters
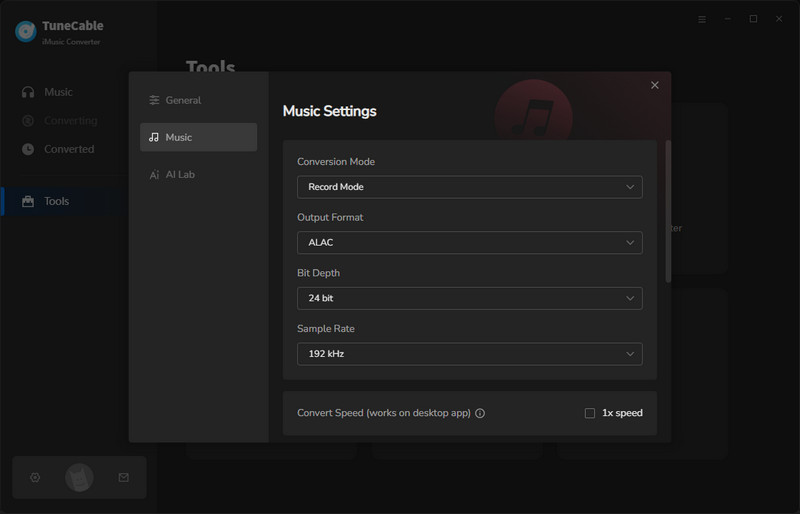
If you can't wait to conduct a conversion right now, you could not download songs in the way you want. TuneCable offers more individual customizations to the output settings. Click on the "Settings" button in the lowr left. Then you can set up the output format, bit rate, sample rate, output folder, etc.
When choosing an output format, you should consider in advance the circumstances under which you plan to use these converted songs. Because the output format of these Apple songs should be compatible with the device or program you may use.
The "AUTO" option in the output format will help export songs in the original format with the original audio quality retained.
Step 4 Converting Apple Songs to Unencrypted Files
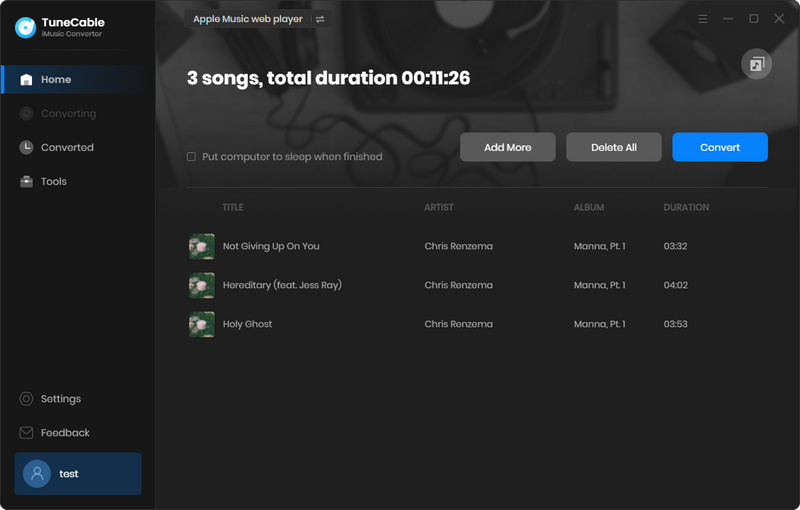
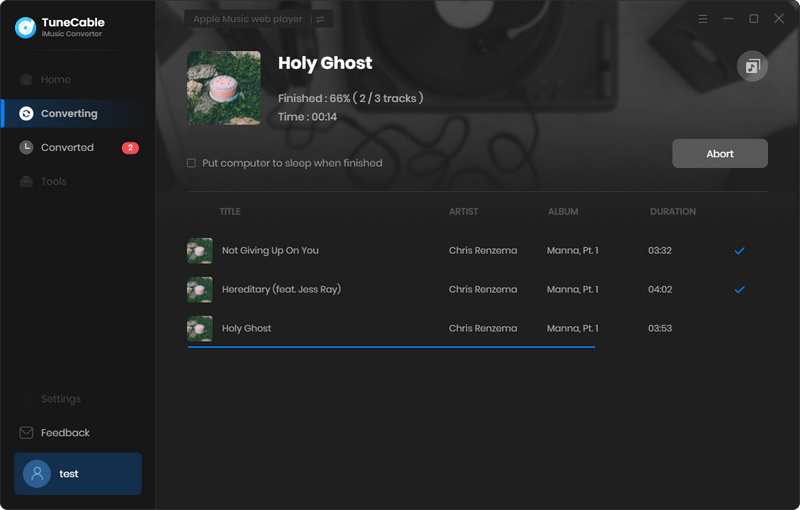
After a series of customized output settings, you are ready for conversion. Head to the "Home" section. hit the "Convert" button to step forward. With a stable network connection, TuneCable processes the conversion at a faster speed. Once it completes, you will be prompted.
Step 5 Freely Use the Converted Apple Songs
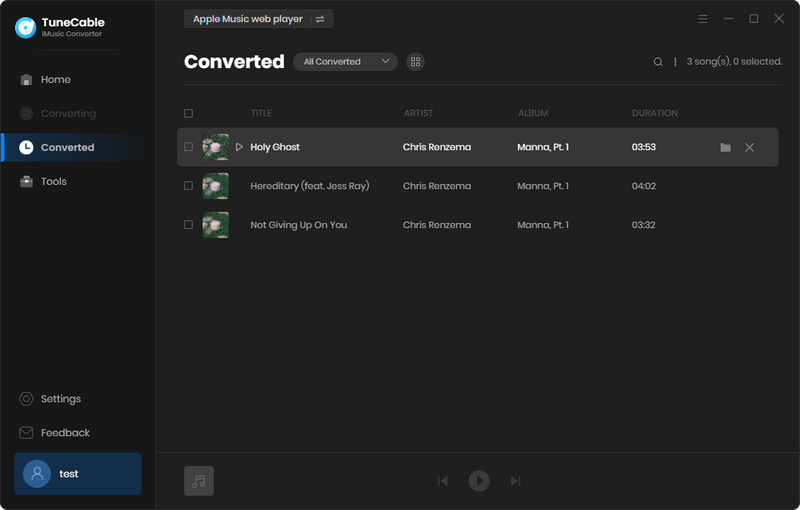
The converted Apple songs will be saved to the output folder. You can play them anytime without the Apple Music app or iTunes. These Apple Music playlists and songs will be yours forever. From now on, you can transfer them to any device, share them with your friends, burn them to CDs, import them to programs, etc. You will never lose your Apple Music playlists since the restrictions from Apple Music are eliminated.
The frustration of seeing missing songs in your Apple Music library is real, and it can be a really unpleasant experience. If you're having this problem, it's possible that the solutions in part 1 can fix this issue, but you can not restore the deleted Apple songs or playlists every time. Getting a TuneCable Apple Music Converter to make a full backup of your Apple Music playlists is the optimal approach to stop Apple Music from removing your playlists next time. You will never be afraid of losing your favorite Apple songs and playlists even if you cancel your subscription to Apple Music one day. If you like our share today please tell people around you how it works. Wish you good every day!
 What's next? Download TuneCable iMusic Converter now!

Download Apple Music, iTunes Music and Audible audiobooks with lossless quality kept.

Download music tracks from Spotify, Amazon Music, Apple music, YouTube Music, TIDAL, Deezer, etc.

Recover lost 1000+ types of files from disks, partitions, hard drives, SD cards, and other external devices.