

TuneCable Spotify Downloader
 >
How To >
Spotify Music Tips >
Adobe Premiere Pro is a powerful video editing software that offers a wide range of features and capabilities for creating professional-quality video content. Adding Spotify music to Premiere Pro can be a useful way to incorporate a particular song or sound into your video project. Music can help set the tone or mood of the video, and can also help to convey a particular message or emotion to the viewer.
Though there are royalty-free music libraries and stock music websites that offer a wide variety of music tracks that can be used in video projects, Spotify Music is still a prior option for most people. There is a wide variety of music from different genres and artists on Spotify and you can search for almost any wanted song on this powerful streaming music platform.
However, how to use copyrighted music from sources like Spotify since it's strictly protected? You may be hindered from using Spotify songs. Things will be much easier if we get rid of the limitations by converting Spotify Music tracks to Adobe Premiere Pro-supported files. In the following content, we will present how to make Spotify songs available for Premiere Pro and use Spotify songs with Premiere Pro freely.
Adobe Premiere Pro includes tools for audio editing and mixing, including audio effects, noise reduction, and the ability to adjust audio levels and balance. Prior to choosing audio files for editing with Premiere Pro, you should check if the audio format is compatible with it. There are multiple formats that can be added to Premiere Pro. We list the supported audio formats by Premiere Pro for your reference:
Premiere Pro Supported Audio Formats: AAC, M4A, MP3, WAV, AIFF, AIF, OMF, WMV
If you want to check the specific page of the supported files, you can learn details on this page.
Adobe Premiere Pro stands out for timeline-based editing, multi-camera editing, color correction and grading, motion graphics, and more powerful editing features. Spotify Music is also a leader in the streaming music industry. It would certainly be exciting to combine the two. However, many difficulties have prevented their further cooperation.
Offline playback is only available for Spotify Premium users. Moreover, even though Spotify music is downloaded to MP3 format with a Premium plan that should be compatible with Premiere Pro, the cached Spotify Music tracks are not allowed to use with other apps for editing. Because the tracks from Spotify are encrypted. To add Spotify songs to a video in Premiere Pro, you should turn the encrypted Spotify files into unprotected local songs. The next part will resolve this problem step by step.
➔ Can I download Spotify Music tracks to Premiere Pro-supported files?
Of course, but we need help. As we mentioned, there are a variety of audio formats that can be used with Premiere Pro, such as AAC, M4A, MP3, WAV, AIFF, AIF, OMF, and WMV. The necessity of finding a program that can convert Spotify music to a format that Premiere Pro can recognize coincides with TuneCable's intention when it released TuneCable Spotify Music Downloader.
TuneCable Spotify Downloader is designed for users who are in request unencrypted Spotify songs. It downloads songs from Spotify and stores them in common formats, like MP3, AAC, FLAC, WAV, AIFF, and ALAC. These files can be freely imported to Premiere Pro for editing.
![]() TuneCable Spotify Downloader
TuneCable Spotify Downloader
➔ Why TuneCable Spotify Music Downloader is necessary?
Although our explanation is very clear, there are still some users who don't understand why they must install this Spotify Music Converter. For some users, the Spotify file itself is in MP3 format. Premiere Pro also supports MP3 audio files. Then why do you need to install additional software to download Spotify songs to MP3 format and import them into Premiere Pro?
You need to be clear that the MP3 audio downloaded directly by Spotify Music offline is an encrypted file protected by DRM. These files are only cached on your local disk, and you can play them through the Spotify app or web player without an internet connection. But if you stop your monthly Spotify subscription, you won't have access to those offline songs. Or you try to use other software to play these songs, which is not allowed. They are nothing more than a bunch of useless cache files.
But with the help of TuneCable, you can save these Spotify songs as ordinary local files. These songs can be transferred or imported to other software for use at will. They are no longer encrypted files, but real local audio files that belong to you.
➔ The detailed steps to convert Spotify music to Premiere Pro-supported files:
Let's follow the instructions below to make Spotify songs, albums, playlists, or even podcasts available for Adobe Premiere Pro.
Step 1 Download and Install TuneCable Music Downloader
Get access to your computer, then install this TuneCable Spotify Music Downloader. The Windows version and Mac version are available. TuneCable supports downloading music from the app or downloading music from the web player. If you choose to download music from the app, the Spotify app will start instantly. If you choose to download music from the web player, the built-in Spotify web player will open immediately. Log in to Spotify with your account.

Step 2 Select Spotify Songs/Albums/Playlist to Download
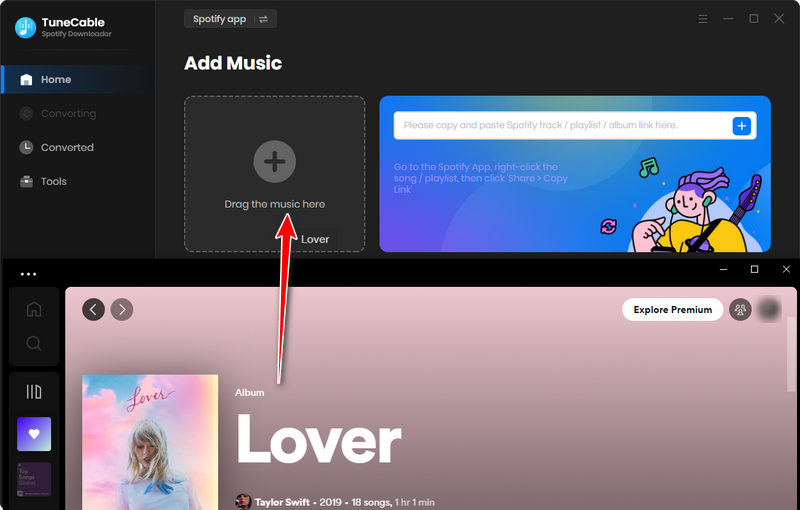
Download music from the app: Browsing the preferred song, album, or playlist on Spotify, then move to its title and drag it to TuneCable. Or click the "three dots" to copy its link then paste the URL to TuneCable.
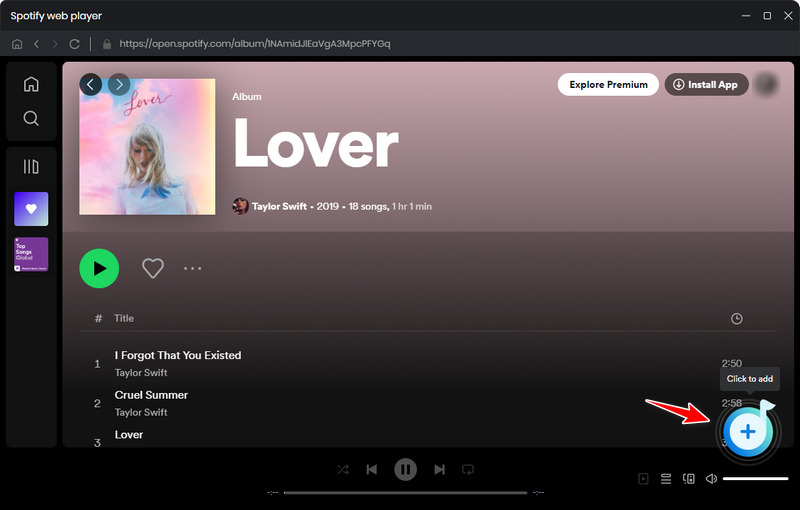
Download music from the web player: Go to any desired album or playlist, enter its homepage and hit the "Click to add" button in ther lower right to load songs.
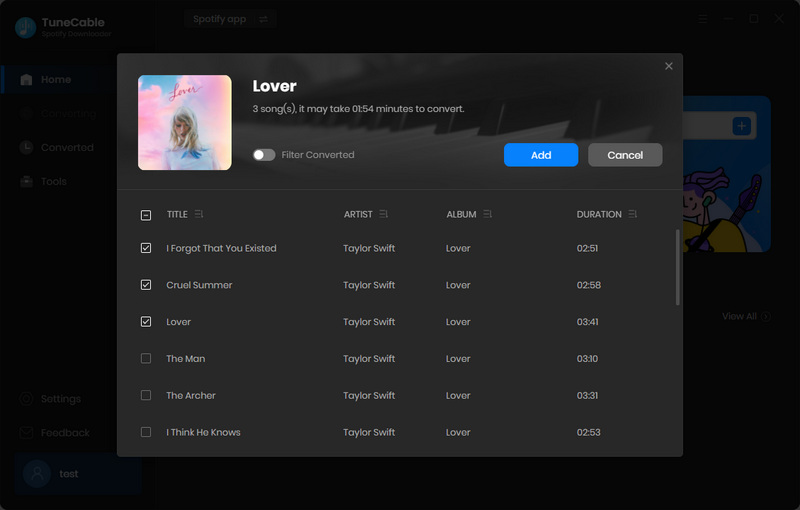
After a while, TuneCable will load songs. Tick off the items you want and click on the "Add" button to move to the further step.
Step 3 Customize the Output Settings of Spotify Music
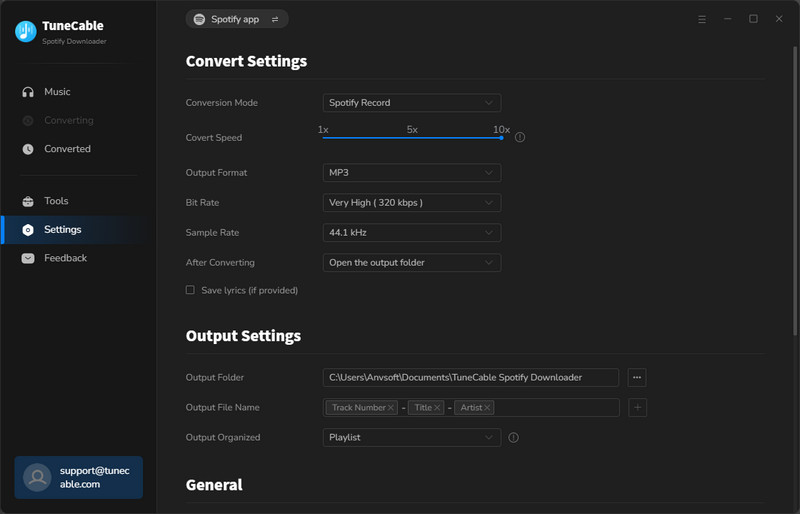
You need to adjust the output parameters before downloading songs, especially the output format. The output format should be compatible with Premiere Pro. Go to the "Settings section. In the output format setting, MP3, AAC, WAV, and AIFF are available for adding to Premiere Pro. The "AUTO" option is prepared for users who are willing to download Spotify songs in the original quality and format.
Convert Settings
Output Settings
Step 4 Convert Spotify Music to Premiere Pro-Supported Files
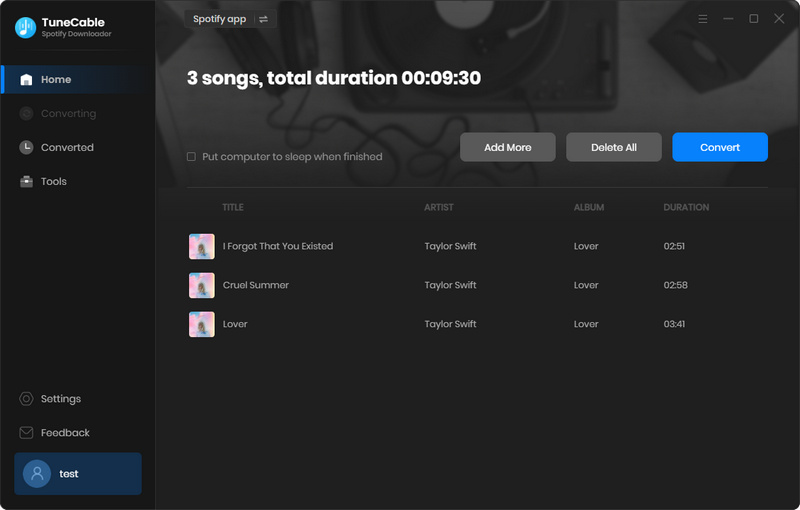
After the setting up, go back to the "Home" section. If you want to convert more songs from other playlists or albums in bulk, hit the "Add More" button in the upper left. Once you are done, click on the "Convert" button to start converting the songs to common formats at a faster speed.
Step 5 Check the Downloaded Spotify Songs
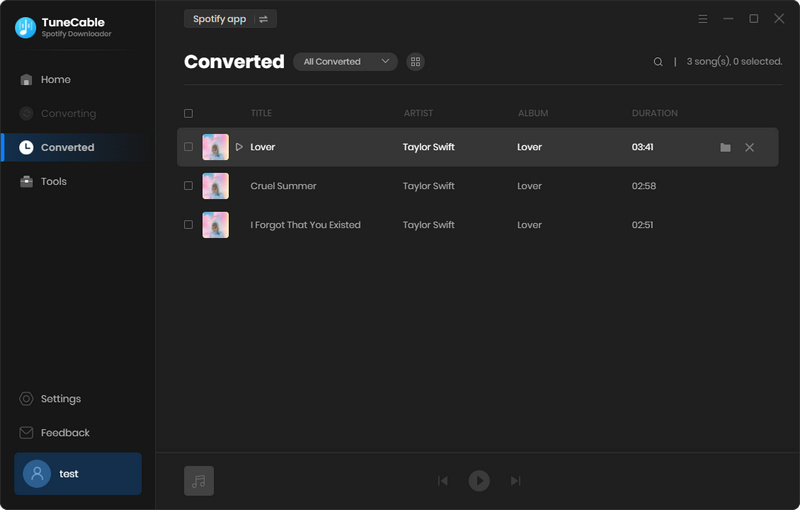
You will see a prompt when the Spotify songs are downloaded successfully. The pop-up window will show where the Spotify songs are stored. Or you can go to the "History" column to check the download history.
After extracting songs from Spotify to your local PC via TuneCable Spotify Music Downloader, we can freely import them to other programs for use. Here are the steps to add Spotify music to Premiere Pro:
Step 1 Find and import Spotify songs:
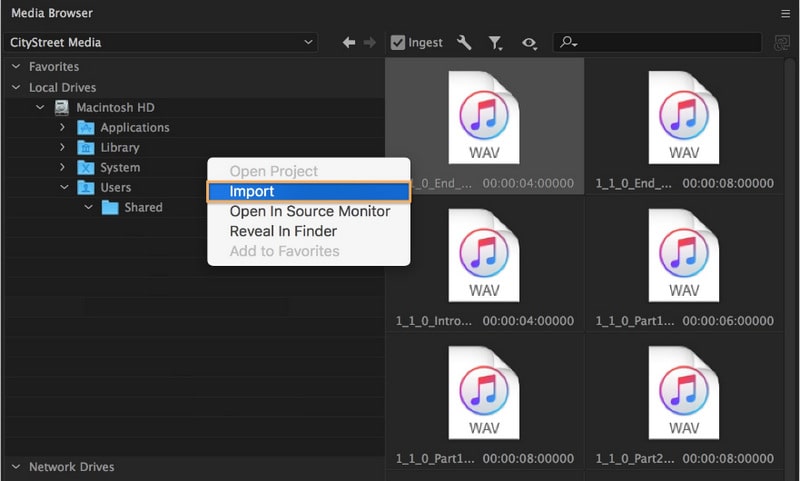
Import the downloaded or recorded music file into Premiere Pro by selecting "Audio" at the top of the screen. And then go to "Window > Workspaces > Audio". Now, you can choose "Window > Media Browser" to reveal the "Media Browser" panel.
In the window of "Media Browser", navigate to the location of the Spotify Music tracks on your computer. Right-click (Windows) or Control-click (macOS) the wanted track, and then tap on "Import" to add it to the "Project" panel. If you plan to simultaneously copy the audio file to your project folder, you should make sure the Ingest box is selected.
Step 2Add the audio to your sequence:
Go to "Window > Project" to open the "Project" panel. The Spotify songs you just imported will be selected. Double-click on the song to open it in the "Source" panel. Then you can see the waveform. Now you can play the song via Premiere Pro.
Drag the audio clip to the sequence in the "Timeline" panel. You can drop the song on any audio track under the video tracks. Trim the audio clip as you would a video clip.
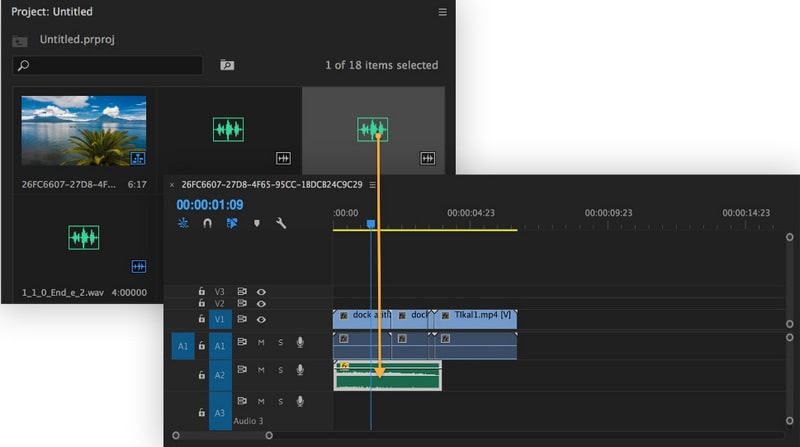
Step 3Adjust the audio track volume:
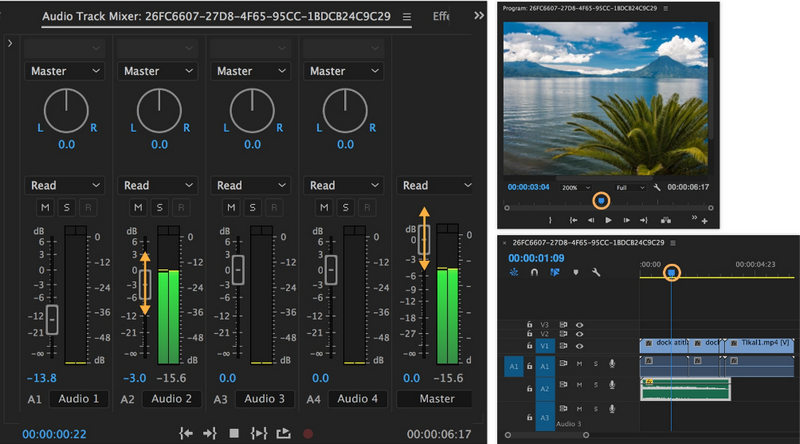
In the "Program" panel (upper right panel), use the spacebar. To halt the playback, press the spacebar again. You can relocate the playback start point by dragging the blue playhead to the desired location.
To adjust the volume of each audio track in your sequence independently, you can use the Audio Track Mixer. First, select "Window > Audio Track Mixer > [sequence name]" to display the mixer for your sequence. The playback controls located at the bottom of the Audio Track Mixer panel let you start, stop, and even loop the playback of your sequence. While your sequence is playing or looping, move the sliders up or down to raise or lower the volume of each individual audio track in your sequence. You can use the "Master" control to adjust the overall audio level.
Note: As you move the controls, aim to maintain the audio levels within the range of -6 to -3 dB. This will help ensure that the audio levels are consistent with those of most other audio projects.
TuneCable Spotify Downloader provides a solution for adding Spotify music to your Premiere Pro projects. Typically, you cannot add songs from streaming services like Spotify to Premiere Pro, but the TuneCable Spotify Music Downloader creates an option and simplifies this process. Moreover, you can use your Spotify music on any platform and with other video editors such as iMovie and Final Cut Pro. Even though you are not a subscriber to Spotify, you can sign up for a free Spotify account and download songs via this tool. The converted songs can be stored on your local PC forever for use anytime. If you find this post helpful, please share it with the people around you. Start a free trial of TuneCable and have fun now!
 What's next? Download TuneCable Spotify Downloader now!

Converts Spotify Music, Playlists, Podcasts with lossless quality kept.

Download music tracks from Spotify, Amazon Music, Apple music, YouTube Music, TIDAL, Deezer, etc.

Recover lost 1000+ types of files from disks, partitions, hard drives, SD cards, and other external devices.